Wednesday, October 28, 2009

Frosted Angel


You Can Find The Tut HERE

Sunday, August 9, 2009

Tag Templates

Well I cant seem to find my tag mojo, but made my first ever tag templates!
If you use them, I would love to see your creations ;)

Tag Template 2


Tag Template 1

Wednesday, July 8, 2009

New Tut - My Style


You Can Find The Tut HERE

New Tut - Twinkle Twinkle


You Can Find This Tut HERE!

Thursday, July 2, 2009

Tuesday, May 19, 2009

New Tutorial Finally - Forever Yours


You Can Find The Tut HERE under TaraLeas Tempting Tutorials

Wednesday, March 25, 2009

NEW TUT ~SASSY~


You Can Find The Tut HERE under TaraLeas Tempting Tutorials

Tuesday, March 17, 2009

Grand Opening PSP Addictive Pleasures

Our PSP Forum Is Now Open!
We Will Be Having A Grand Opening Bash Starting Fri. March 20th
Right Now We Have Opened Up The Membership Drive, With Some Great Prizes!
The Rest Of The Comps Will Start Friday, Woot!
Barbara Jensen Has Agreed To Judge One Of Our Tag Comps, Theres some great prizes being given for this one to!
And There Are A Few More Surprises!
If You Want To Join In On The Fun, Make Sure You Become A Member.
You Can Click The Tilte Of This Post To Get There
See You Soon!!

Friday, February 20, 2009

UPDATE

Hi Everyone! My Puter Went To Crap, But I Got A New One.
In The Process Of Getting Everything On This One.
Thank You For The Awards, I Will Get Them Posted ASAP!
Hopefully I Will Be Able To Get A Few Tuts Done This Weekend :)
Hope Everyone Has A Fab Weekend!!
((((HUGS))))
TaraLea

Wednesday, February 4, 2009

Touched By Love


Click tag for full view.

I am using the beautuful
Artwork of Jessica Doughtery.
You must purchase a license to use her art.
You may do so at CILM

Supplies:
1 tube of choice & Font of choice.
For the font I used P22 Ruthie .

Scrapkit of choice or the one I used
Touched By Love (PTU) by The Urban Fairy
You can purchase this kit HERE OR HERE
Thank You Hun!

Ready?...Let's begin!!

New image, size 600 x 600
Floodfill white.

Open element 014 from the kit.
Resize to your liking, copy and paste
as a new layer, dropshadow of coice.
I used 1,1,50,7

Open flower of choice.
Resize to your liking, copy and paste
as a new layer, put in the right hand corner, dropshadow of coice.
I used 1,1,50,7

Open another flower of choice.
Resize to your liking, copy and paste
as a new layer, put in the right hand corner, overlapping the first flower,
dropshadow of coice, I used 1,1,50,7

Open frame of choice .
Resize to your liking, copy and paste
as a new layer, image rotate 10 degrees to the left,
move the frame over slightly to the left,
take your magic wand, click inside the frame,
selections - modify - expand by 3
copy and paste a paper of choice under your frame layer,
resize to your liking, selections - invert, hit delete
copy and paste a tube of choice, make sure the part you want is showing
inside the seletion, hit delete. Select none.
dropshadow of coice to your frame layer and tube layer, I used 1,1,50,7

Copy and paste a flower of choice ( I used the single rose from the kit)
resize to your liking, move over to the right of the frame,
add dropshadow of choice, I used 1,1,50,7
duplicate layer, resize a little smaller than the original
rotate to the left 10 degrees, duplicate layer, resize a little smaller again
image mirror, move back over to the other flowers, arrange them to look like
a small bouquet, copy and paste a bow of choice, resize to liking, put on top
of the stems to make it look like its holding the flowers together,
(see my tag for reference) dropshadow of choice, I used 1,1,50,7

Copy and paste any other elements of choice, resize,
add dropshadow of choice.

Crop and resize your tag to your liking.

Add your Artist © and save!! Yay, You Are Done!
Hope you enjoyed my tutorial & thank you for trying it! :)

Written by TaraLea February 4, 2009
Any resemblance to another tutorial is purely coincidental.

Sunday, February 1, 2009

BLOG CHALLENGE

Well, Kay of Kay Xclusive has left me my first ever blog challenge.YAY!
The challenge is to go to My Pictures Album and upload the Sixth picture of the Sixth Folder. Post it and Explain it. Here is my picture. This is a picture
of our baby of the house Shadow, hes three. This was taken when I got a new
camera and I wanted to test it. My whole family went into hiding, and Shadow tried
by going under a table but I got the pic anyways! Isn't he CUTE!

Photobucket

Now I have to pass this challenge on,
so I am passing it to..

Litl Girl Blue (Jess)

And

Sarah

Cant Wait to see what you ladies post!
((((HUGS))))

Saturday, January 31, 2009

Beautiful Cupid


Click tag to get full view.

I am using the awesome
Artwork of Armando Huerta.
You must purchase a license to use his art.
You may do so at MPT

Filters Used:
Xero-Soft Mood

Supplies:
Tubes of choice & Font of choice.
For the font I used P22 Corinthia.

Scrapkit of choice or the one I used
Cupid Caught (PTU) by Loyal KD
You can purchase this kit HERE
Thank you!

Template #43 by AquaRebel HERE
Thank you!

Thank You ladies for sharing your wonderful
talent with the psp and scrapping community.
Remeber to leave some love when downlaoding supplies :)

Ready?...Let's begin!!

Open your supplies in PSP.

Copy template by hitting shift+D on your keyboard
Close the original.
Delete the copyright layer.
Go to image canvas size, resize 600x600
You can crop and resize later.

In your layer pallete click on the Raster 4 layer
with your magic wand click on the rectangle.
copy and paste a paper of choice as a new layer
selections, invert and hit delete on your keyboard
select none, add drop shadow of choice, I used 1,1,50,7
delete the Raster 4 layer.

In your layer pallete click on the Copy of Raster 4 layer
with your magic wand click on the rectangle.
copy and paste a paper of choice as a new layer
selections, invert and hit delete on your keyboard
select none, add drop shadow of choice, I used 1,1,50,7
delete the Copy of Raster 4 layer.

In your layer pallete click on the Raster 5 layer
with your magic wand click on the rectangle.
copy and paste a paper of choice as a new layer
selections, invert and hit delete on your keyboard
select none, add drop shadow of choice, I used 1,1,50,7
delete the Raster 5 layer.

In your layer pallete click on the Raster 3 layer
with your magic wand click on the rectangle.
copy and paste a paper of choice as a new layer
selections, invert and hit delete on your keyboard
select none, add drop shadow of choice, I used 1,1,50,7
delete the Raster 3 layer.

In your layer pallete click on the Raster 6 layer
Go to selections, select all, selections, float, selections, defloat
Layers, new raster layer, flood fill inside your selection with a color of choice
Select none.
delete the Raster 6 layer.

In your layer pallete click on the Raster 1 layer
with your magic wand click on the rectangle.
copy and paste a paper of choice as a new layer
selections, invert and hit delete on your keyboard
select none, delete the Raster 1 layer.

In your layer pallete click on the Raster 2 layer
with your selection tool set on rectangle
select around one of the squares on the frame
copy and paste a tube of choice, below the frame layer
selections invert, hit delete, add drop shadow of choice
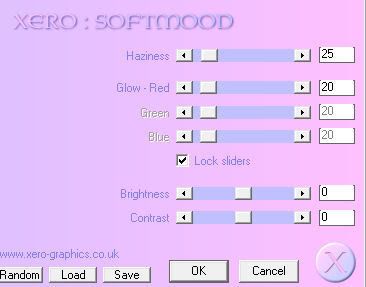
to your tube layer. Go to effects, Xero-Soft Mood
with the settings below, after you apply the filter.
go to adjust sharpen.

Photobucket

Repeat the step above with the other two squares in the frame.

Add a drop shadow of choice to your frame layer.

In your layer pallete click on the Raster 7 layer
with your magic wand click inside the heart.
copy and paste a paper of choice as a new layer
selections, invert and hit delete on your keyboard
select none, add drop shadow of your choice
delete the Raster 7 layer.

Copy and paste as a new layer a flower of choice,
resize to your liking, place in the upper right hand corner
of your tag behind your frame background layer
see my tag for reference, add drop shadow of choice,
I used 1,1,50,7, layers duplicate, image mirror.
Repeat the above step using another flower of choice.

Click back on your top layer, copy and paste a ribbon of choice,
resize to your liking, place at the top right hand corner of your frame layer
add drop shadow of choice, I used 1,1,50,7, layers duplicate, image mirror

Copy and paste another flower of choice, resize to your liking,
place at the top right hand corner on top of your ribbon
add drop shadow of choice, I used 1,1,50,7, layers duplicate, image mirror

Copy and paste a bow of your choice, resize to your liking.
image rotate to the right 15 degrees. paste at the bottom of tag,
over to the right, add drop shadow of choice, I used 1,1,50,7
layers duplicate, image mirror

add any other embelishments of choice, add drop shadow of choice.

Crop and resize your tag to your liking.

Add your Artist © and save!! Yay, You Are Done!
Hope you enjoyed my tutorial & thank you for trying it! :)

Written by TaraLea January 31th 2009
Any resemblance to another tutorial is purely coincidental.

Thursday, January 29, 2009

A Little Romance


Click on tag to view full size

I am using the beautuful
Artwork of Jennifer Janesko.
You must purchase a license to use her art.
You may do so at CILM

Supplies:
3 tubes of choice & Font of choice.
For the font I used Love Light.

Filters Used:
Xero Porcelain
Xenofex2
(Both Optional)

Scrapkit of choice or the one I used
Romance The Heart (PTU) by Missy
You can purchase this kit HERE
Thank you!

Valentine Template 6 by Ali HERE
Thank you!

Mask 191 by Vix HERE under goodies
Thank you!

Thank You ladies for sharing your wonderful
talent with the psp and scrapping community.
Remeber to leave some love when downlaoding supplies :)

Ready?...Let's begin!!

Open your supplies in PSP.

Copy template by hitting shift+D on your keyboard
Close the original.
Delete the copyright layer (Raster 5).
Go to image canvas size, resize 700x700
You can crop and resize later.

Layers, new raster layer, floodfill white and drag
this layer to the very bottom.

In your layer pallete click on the Raster 2 layer
with your magic wand click inside the gray area.
copy and paste a paper of choice as a new layer
selections, invert and hit delete on your keyboard
select none, delete the Raster 2 layer.

In your layer pallete click on the Raster 3 layer
selections, selections float, selections defloat.
copy and paste a paper of choice as a new layer
selections, invert and hit delete on your keyboard
select none, add drop shadow of choice, I used 1,1,70,7
delete the Raster 3 layer.

In your layer pallete click on the Copy of Raster 1 layer
with your magic wand click inside the heart.
copy and paste a tube of choice as a new layer, resize to your liking,
make sure the part of the tube you want is inside the selection
selections, invert and hit delete on your keyboard
Effects Xero Porcelain with the settings pictured below
or you may have to play around with the settings to look good on your tube.

Photobucket

Repeat the above steps with the Copy (2) of Raster 1 layer
and the Raster 1 layer.
Add a drop shadow of choice to the heart layers, I used 1,1,70,7.

In your layer pallete click on the Copy (2) of Raster 4 layer
selections, selections float, selections defloat.
copy and paste a paper of choice as a new layer
selections, invert and hit delete on your keyboard
select none, add drop shadow of choice, I used 1,1,70,7
delete the Copy (2) of Raster 4 layer.

Repeat the above step for your Copy of Raster 4 layers
and your Raster 4 layer.

Copy and paste as a new layer a flower branch of choice,
resize to your liking, place behind your template layers, to the right
and rotate to your liking, having stick it out the side a little
see my tag for reference, duplicate layer, image mirror, move down some,
erase any parts sticking out at the bottom of your tag, add drop shadow of choice,
I used 1,1,70,7

Click back on your top layer, copy and paste a candle of choice,
resize to your liking, place at the bottom right hand corner
add drop shadow of choice, I used 1,1,70,7
Paste some flowers of choice at the bottome of candle,
resize to your liking, add drop shadow of choice,
I used 1,1,70,7

Click on your bottom layer, copy and paste a paper of choice
New mask layer from image, vix mask 191, source luminance checked,
invert mask data unchecked, hit okay, merge group.
Resize to your liking, after I resized mine, I used the raster deform tool,
to pull it up and down so it could be seen at the top and bottom of my tag.

Crop and resize your tag to your liking.

Add your Artist © and save or you can animate it.
My animation is below!

~ANIMATION~

Click on your mask layer, duplicate,
Alien Skin Xenofex2 Constellation, with the settings shown below

Photobucket

copy merged, paste into animation shop as a new image
go back to psp, edit, undo constellation
repeat constellation, hitting the random seed button once
copy merged, paste into animation shop after current frame,
repeat this step again, giving you three frames.
Save! Yay your done!

Hope you enjoyed my tutorial & thank you for trying it! :)

Written by TaraLea January 29th 2009
Any resemblance to another tutorial is purely coincidental.

Saturday, January 24, 2009

Woot!! My First Award


My very first award,
I was very surprised and honored to receive this award.
I got this award from a very talented lady
Thank you so much Kay!
You can find Kays fabulous tuts and much more at her
beautiful blog KayXclusive HERE

I am passing this blog award to.....

Viv at Sinfully Blissful HERE

Deb at Debs Scrap Designs HERE

Sarah at Shadows Creations HERE

and Mz.Dixi at MzDixi's Southern Charms HERE

Thank you ladies for sharing your talents with the PSP world
You all ROCK!!

Friday, January 23, 2009

Never Say Goodbye


Click tag to get full view.

I am using the beautuful
Artwork of Barbara Jensen.
You must purchase a license to use her art.
You may do so HERE

Supplies:
1 tube of choice & Font of choice.
For the font I used TheNautigal(PTU).

Scrapkit of choice or the one I used
Never Say Goodbye (PTU) by Tammy
You can purchase this kit HERE
Thank you!

Template #4 by Ms.Diva HERE
Thank you!

Thank You ladies for sharing your wonderful
talent with the psp and scrapping community.
Remeber to leave some love when downlaoding supplies :)

Ready?...Let's begin!!

Open your supplies in PSP.

Copy template by hitting shift+D on your keyboard
Close the original.
Delete the copyright layer.
Go to image canvas size, resize 600x600
Click on the background layer in your layer pallete
and floodfill white or keep black if you like.

In your layer pallete click on the layer called Dota
go to adjust, hue and saturation, colorize to your liking.
add drop shadow of choice, I used 1,1,70,5

In your layer pallete click on the rectangle inside layer
with your magic wand click on the rectangle,
copy and paste a paper of choice as a new layer,
go to selections, invert than hit delete on your keyboard.
delete the rectangle inside layer

In your layer pallete click on the right square inside layer
with your magic wand click on the square,
copy and paste a paper of choice as a new layer,
go to selections, invert than hit delete on your keyboard.
delete the right square inside layer

In your layer pallete click on the left square inside layer
with your magic wand click on the square,
copy and paste a paper of choice as a new layer,
go to selections, invert than hit delete on your keyboard.
delete the left square inside layer

In your layer pallete click on the heart inside layer
with your magic wand click on the heart,
copy and paste a paper of choice as a new layer,
go to selections, invert than hit delete on your keyboard.
copy and paste a tube of choice as a new layer and hit delete
in your layer pallete lower the opacity of your tube to about 50
delete the heart inside layer

Add a dropshadow of choice to your heart frame layer,
left square frame layer, right square frame layer and
the rectangle frame layer. I used 1,1,70,5

Copy and paste as a new layer a couple of flowers of choice,
resize to your liking, place in the upper left hand corner
of your tag above your dota layer and below the rest of the layers
see my tag for reference, add drop shadow of choice,
I used 1,1,70,5

Click back on your top layer, copy and paste a ribbon of choice,
resize to your liking, place at the bottom of the template
add drop shadow of choice, I used 1,1,70,5

Copy and paste a bow of your choice, resize to your liking
and place on the right hand side of your tag, see my tag for reference,
add drop shadow of choice, I used 1,1,70,5

Copy and paste journal page of your choice, I used journal page 2
from the kit, resize to your liking, go to image mirror and place at
the right hand side of your tag, see my tag for reference,
take your eraser tool, size 4, hardness 15, step 10,
density and thickness 100, opacity 33
and erase part of the medal peice on the journal page at
the top so it looks like its connected to the template,
see my tag for reference.
add drop shadow of choice, I used 1,1,70,5
use font of choice and add some words to your journal page,
image, rotate, free rotate, right 12.
add drop shadow of choice, I used 1,1,50,5

Add any other elements of choice, resize to your liking
I used a few flowers, double stitched heart,
sachet and a butterfly from the kit.
add drop shadow of choice to them, I used 1,1,70,5

Add your tube of choice and place to your liking.
Dropshadow of choice, I used 2,2,70,5

Crop and resize your tag to your liking.

Add your Artist © and your Name and save!! Yay, You Are Done!
Hope you enjoyed my tutorial & thank you for trying it! :)

Written by TaraLea January 23th 2009
Any resemblance to another tutorial is purely coincidental.

Monday, January 19, 2009

Emerald Beauty


Click tag to get full view.

I am using the beautuful
Artwork of Anthony Guerra.
You must purchase a license to use his art.
You may do so at CILM

Supplies:
1 tube of choice & Font of choice.
LHF Sarah Script (PTU).

Scrapkit of choice or the one I used
Emerald Beauty (FTU) by Bluey
HERE
Thank you!

Mask of choice or the one I used sg_lace-bouquet-frame
from EssexGirl HERE

Thank You ladies for sharing your wonderful
talent with the psp and scrapping community.
Remeber to leave some love when downlaoding supplies :)

Ready?...Let's begin!!

Open your supplies in PSP.
New canvas 600x600,
you may resize/crop later. Flood fill white.

Open up frame of choice, copy and paste
as a new layer.
Click inside frame with your magic wand, selections,
modify, expand by 3
copy and paste paper of choice, behind frame layer
selections, invert, delete. Do not deselect yet!
Copy and paste tube or closeup of choice, inbetween the
paper layer and frame layer, resize if needed, hit delete.
Select none. Lower the opacity of this layer to around 50.
Dropshadow your frame layer.

Copy and paste as a new layer the ivy from the kit
resize as needed, place in the right hand corner of your frame
layers duplicate, image mirror, image flip
Dropshadow of choice.

Copy and paste the cushion bow, resize as needed
and arrange on your tag to your liking.
Dropshadow of choice.

Copy and paste the candle from the kit, resize as needed,
place in the left hand corner of your frame
Dropshadow of choice.

Add any other elements/flowers to you liking.
Dropshadow of choice.

Add tube of choice and place to your liking.
Dropshadow of choice.

Click on your background layer,
copy and paste paper of choice as a new layer
add mask, source luminance, invert mask data unchecked
resize mask 90%

Crop and resize your tag to your liking.

Add your Artist © and your Name and save!! Yay, You Are Done!
Hope you enjoyed my tutorial & thank you for trying it! :)

Written by TaraLea January 19th 2009
Any resemblance to another tutorial is purely coincidental.

Sunday, January 18, 2009

Happy Couple


Click image to see tag full size!

I am using the beautuful artwork of Elias Chatzoudis.
You must purchase a license to use his art.
You may do so at MPT

Supplies:
1 tube of choice & Font of choice.
I am using Good Vibrations (PTU).

Eye Candy 4000 Gradient Glow

Scrapkit of choice or the one I used by Teresa called Happy Hearts,
you can purchase it HERE or HERE
Thank you!

The Template is from Kay over at
Kays Xclusive
Thank you!

Mask of choice or the one I used WSL_Mask10
from Weescotslass

Thank You ladies for sharing your wonderful talent
with the psp and scrapping community.

Ready?...Let's begin!!
Open your supplies in PSP.
Open the template and delete the copyright layer
go to canvas resize 600x600,you may resize/crop later.
I flood filled the background layer white
but you can keep it black if you like.

Click on Rectangle layer in your layer pallete.
Selections, select all, float, defloat,
Copy and paste a paper of choice from the kit,
selections invert, hit delete.
Give a DS of choice, I used 1,1,70,5.
Select none. Delete your retangle layer.
Repeat the above steps with the rest of the template layers
except the wordart.
Colorize the wordart go to adjust hue and saturation, colorize to your liking,
I used 255 for both hue and saturation and
than I adjusted the brightness -107 and contrast 42 to make it a darker shade.
Eye Candy 4000 gradient glowBasic- 3, 25, 100 Color-white/fat
Dropshadow 1,1,70,5 or to your liking :)

Click on your background layer, copy and paste paper of choice
and apply your mask of choice.
Add your tube where you like, I put mine inbetween my mask layer and template layers. Dropshadow of choice or the one I used 2,2,70,5
Add any other elements you like and dropshadow.
Crop and resize to your liking.


Add your Artist © and your Name and save!!
Yay, You Are Done!
Hope you enjoyed my tutorial & thank you for trying it! :)

Written by TaraLea January 18th 2009
Any resemblance to another tutorial is purely coincidental.