Click on tag to view full size
I am using the beautuful
Artwork of Jennifer Janesko.
You must purchase a license to use her art.
You may do so at CILM
Supplies:
3 tubes of choice & Font of choice.
For the font I used Love Light.
Filters Used:
Xero Porcelain
Xenofex2
(Both Optional)
Scrapkit of choice or the one I used
Romance The Heart (PTU) by Missy
You can purchase this kit HERE
Thank you!
Valentine Template 6 by Ali HERE
Thank you!
Mask 191 by Vix HERE under goodies
Thank you!
Thank You ladies for sharing your wonderful
talent with the psp and scrapping community.
Remeber to leave some love when downlaoding supplies :)
Ready?...Let's begin!!
Open your supplies in PSP.
Copy template by hitting shift+D on your keyboard
Close the original.
Delete the copyright layer (Raster 5).
Go to image canvas size, resize 700x700
You can crop and resize later.
Layers, new raster layer, floodfill white and drag
this layer to the very bottom.
In your layer pallete click on the Raster 2 layer
with your magic wand click inside the gray area.
copy and paste a paper of choice as a new layer
selections, invert and hit delete on your keyboard
select none, delete the Raster 2 layer.
In your layer pallete click on the Raster 3 layer
selections, selections float, selections defloat.
copy and paste a paper of choice as a new layer
selections, invert and hit delete on your keyboard
select none, add drop shadow of choice, I used 1,1,70,7
delete the Raster 3 layer.
In your layer pallete click on the Copy of Raster 1 layer
with your magic wand click inside the heart.
copy and paste a tube of choice as a new layer, resize to your liking,
make sure the part of the tube you want is inside the selection
selections, invert and hit delete on your keyboard
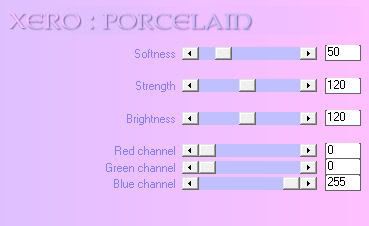
Effects Xero Porcelain with the settings pictured below
or you may have to play around with the settings to look good on your tube.

Repeat the above steps with the Copy (2) of Raster 1 layer
and the Raster 1 layer.
Add a drop shadow of choice to the heart layers, I used 1,1,70,7.
In your layer pallete click on the Copy (2) of Raster 4 layer
selections, selections float, selections defloat.
copy and paste a paper of choice as a new layer
selections, invert and hit delete on your keyboard
select none, add drop shadow of choice, I used 1,1,70,7
delete the Copy (2) of Raster 4 layer.
Repeat the above step for your Copy of Raster 4 layers
and your Raster 4 layer.
Copy and paste as a new layer a flower branch of choice,
resize to your liking, place behind your template layers, to the right
and rotate to your liking, having stick it out the side a little
see my tag for reference, duplicate layer, image mirror, move down some,
erase any parts sticking out at the bottom of your tag, add drop shadow of choice,
I used 1,1,70,7
Click back on your top layer, copy and paste a candle of choice,
resize to your liking, place at the bottom right hand corner
add drop shadow of choice, I used 1,1,70,7
Paste some flowers of choice at the bottome of candle,
resize to your liking, add drop shadow of choice,
I used 1,1,70,7
Click on your bottom layer, copy and paste a paper of choice
New mask layer from image, vix mask 191, source luminance checked,
invert mask data unchecked, hit okay, merge group.
Resize to your liking, after I resized mine, I used the raster deform tool,
to pull it up and down so it could be seen at the top and bottom of my tag.
Crop and resize your tag to your liking.
Add your Artist © and save or you can animate it.
My animation is below!
~ANIMATION~
Click on your mask layer, duplicate,
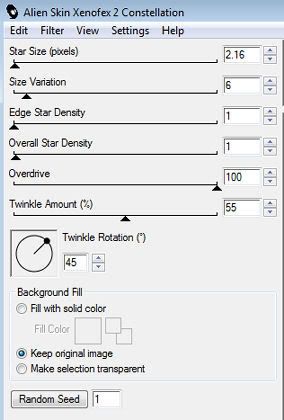
Alien Skin Xenofex2 Constellation, with the settings shown below

copy merged, paste into animation shop as a new image
go back to psp, edit, undo constellation
repeat constellation, hitting the random seed button once
copy merged, paste into animation shop after current frame,
repeat this step again, giving you three frames.
Save! Yay your done!
Hope you enjoyed my tutorial & thank you for trying it! :)
Written by TaraLea January 29th 2009
Any resemblance to another tutorial is purely coincidental.


No comments:
Post a Comment